.jpg)

Floor Fixes: How to Repair Broken Tile and Choose Waterproof Wood Floors
Floor Fixes: How to Repair Broken Tile and Choose Waterproof Wood Floors
Flooring takes a beating. From a dropped cast iron pan to heavy furniture being dragged across the room, it's inevitable that tiles will crack and wood floors will eventually show wear.
At Haslett Handyman, we believe in tackling the immediate fixes while also helping you plan for long-term durability. This guide covers how to repair that frustrating broken tile and why waterproof wood flooring has become the go-to solution for busy Michigan homes.
Part 1: Quick Fix – How to Repair a Broken Tile
A cracked tile is not just an eyesore; it's a structural vulnerability. It allows water and dirt to penetrate the subfloor and compromise the surrounding grout and tiles. Fortunately, replacing a single tile is a manageable job if you have the replacement piece.
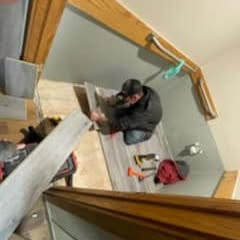
1. Safely Remove the Damaged Tile
The goal is to remove the broken tile without cracking the ones next to it.
- Protect the Perimeter: Use painter's tape to cover the four adjacent tiles. This protects them from accidental chipping and scratching during the removal process.
- Remove the Grout: Use a grout saw or a specialized utility knife to carefully cut and scrape away all the grout surrounding the broken tile. This is critical for creating space to lift the tile.
- Break the Seal: Using a hammer and a cold chisel (or a sturdy putty knife), start chipping away at the center of the broken tile. Work slowly toward the edges. Focus the chisel blows on the center, which helps shatter the bond to the subfloor without affecting the surrounding areas.
- Clear the Area: Once the old tile is removed, scrape up the remaining thin-set mortar from the subfloor to ensure a flat, clean surface for the new tile.
2. Install the New Tile
- Mix the Mortar: Mix a batch of thin-set mortar according to the package directions.
- Trowel the Mortar: Use a notched trowel to apply the mortar to the clean subfloor surface where the tile will go. The trowel's notches ensure the correct amount of mortar is used.
- Set the Tile: Press the new tile firmly into the mortar. Use plastic tile spacers to maintain the gap consistency with the surrounding tiles.
- Level and Cure: Gently tap the tile with a rubber mallet to ensure it is level with the others. Wipe off any excess mortar immediately and allow the mortar to cure completely (usually 24 hours).
3. Re-grout
Once the mortar is dry, mix and apply fresh grout, ensuring it fills the gaps completely. Wipe off the excess with a damp sponge and allow the grout to haze before performing the final cleaning. Your floor is now sealed and structurally sound again!
Part 2: Long-Term Solution – Why Choose Waterproof Wood Flooring?
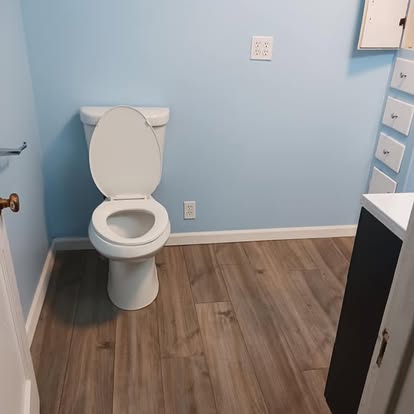
When it's time for a larger renovation, especially in moisture-prone areas like kitchens, bathrooms, or basements, the innovation in waterproof wood flooring is a game-changer. This isn't your grandmother's laminate; these modern solutions combine the beauty of hardwood with the resilience of vinyl or tile.
A. The Benefits of Waterproof Wood Floors
- True Moisture Resistance: Unlike traditional engineered hardwood, which can swell and warp if moisture penetrates the core, waterproof wood flooring typically uses a Stone Plastic Composite (SPC) or high-density Vinyl/Plastic Core (WPC). This core is 100% waterproof.
- Increased Durability: These floors are incredibly scratch and dent-resistant, making them ideal for high-traffic areas, kids, and pets—a perfect fit for active households in the Lansing area.
- Aesthetic Versatility: Modern waterproof floors offer hyper-realistic wood grain textures, colors, and plank sizes. You can get the look of expensive hickory or oak without the worry of water damage.
- Easy Installation: Most waterproof planks utilize a simple click-and-lock system, which is easier and faster to install than traditional nail-down hardwood or messy ceramic tile.
B. Ideal Locations for Waterproof Wood
If you love the wood look but need water protection, consider these rooms:
- Kitchens: The perfect defense against spills, dishwashing splashes, and melting ice from the fridge.
- Basements: Excellent for combating minor humidity or small leaks that are common below ground level.
- Bathrooms (excluding shower enclosures): Provides a warm, clean look that traditional engineered wood could never safely provide.

The Haslett Handyman Solution
Whether you're dealing with the headache of a broken tile or planning a complete floor transformation with waterproof wood flooring, the quality of the installation is paramount to its longevity.
If you don't have the time to meticulously chip away at that old mortar, or if your flooring project involves leveling a subfloor or installing transitions, the Haslett Handyman team is ready to deliver a perfect, durable finish.
Contact us today to get that single cracked tile replaced or to discuss upgrading your home with beautiful, maintenance-free waterproof floors!